What's New:
6/24/2014: Added Repair Notes page link to this one
HP Laserjet II and HP Laserjet III
LASER PRINTERS
REPAIRS AND SERVICE NOTES
INTRODUCTION
The Hewlett-Packard Laserjet Series II and III laser printers cost about $ 3000 in the early 1990's and are very robust, reliable machines which today are quite economical to use, provided you are not in need of 600 dpi resolution or color images. They are both based on the Canon SX series "print engine," which was also used in a variety of other branded printers. The Laserjet III uses the same basic Canon SX engine as the II, but has a newer design DC controller card and some other electronic differences. You used to be able to find a great deal of background information about these Laserjets on other websites such as The Printer Works, but times change and we are fighting a battle now to keep these printers running. My intent here is to provide service data you won't find anywhere else. I suggest if you are starting from scratch, stick to the Laserjet III and don't bother with the II series. The III is slightly faster, important if you are printing pages with graphics, although it is larger than the II. There is one caveat, though. It is harder to keep the III running, because the DC Controller boards are failing at an alarming rate. I have not been able to pinpoint which component on the board is causing this, so if you have found it, do let me know! The II, in contrast, just seems to soldier on forever.
I prepared this web page because there is an overload of useless information on the web about these printers, most of which is just advertising trying to sell you overpriced cartridges and parts, rather than anything actually useful to those of us wanting to fix and use these printers. This page is intended to help people who have at least a basic electronics background, to maintain these printers and make good ones out of cast-off examples, while saving a great deal of money. It is anticipated that you will want to obtain the service and parts manuals and get reasonably familiar with them before getting involved in the repair of these printers. What is discussed below is most of what I have learned during the nine years I have been using and maintaining Laserjet II and III printers.
Please note that for the most part, the main modules on top in these printers are plug-in types and do not require unsoldering or unplugging wire connectors. The circuit boards and mother board are located "upside down" in the base of the printer, and those do have a number of connectors which must be unplugged to remove them.
Please also note that Windows 7 and newer operating systems have dropped Laserjets with the SX engine (II, III etc.) from the list of supported printers on the drop-down menu. If you have found a work around, please advise me!
DOCUMENTATION
There are many manuals. Below is a list of some of them I have acquired. Be aware that as of recently, HP was still selling the two-volume set of "Quick Reference Service Guide" pocket manuals, which cover faults in a wide variety of printers besides the II and III. Part number for the set is 5040-9068. HP's price is rather reasonable and will inevitably beat eBay prices on the same item (where do you think the eBay sellers are getting their manuals to sell?) The Printer Works' website contains exploded parts diagrams which are helpful to print and refer to.
HP 33440 Laserjet Series II Printer 33440-9096 A thin paperback booklet with summaries of operation, troubleshooting charts, part number lists and so forth. Much of it works for the III series as well.
Getting Started with the Laserjet Series II Printer 33440-90908 Not all that useful, but one of the set. No technical assistance in this one, just basic setup information, much of which is DOS-era word processing. Don't pay much for this one and you don't really need it.
Laserjet Series II Printer User's Manual 33440-9091 The basic user's manual. A good idea to have, but again, don't pay much for this one.
Laserjet Series III Printer User's Manual 33449-90901 As above, but for the III series.
HP 33440A Laser Printer Service Manual This is a must have and probably the most important one. It doesn't have a title page mentioning what series it's for, but mine is for the II. Presumably there is a III series as well, titled HP 33449A Laser Printer Service Manual. A large vinyl three-ring binder. This one is worth buying, but HP probably doesn't have them anymore so eBay is the best bet.
HP Laserjet Family Quick-Reference Service Guide 5040-9068 This is a two volume small paperback set which covers all the HP laser printer models through approximately 1998. It mainly contains summaries of display panel trouble codes and a slight amount of additional information. As of 2003 you were able to order these directly from HP Parts for under $ 10, including shipping.. There are several dishonest eBay sellers who hawk these booklets as some sort of hard-to-find master service manual and start their auctions at several times the full retail price from HP. Don't be fooled by these crooks.
Software Application Notes 33449-90917 There are several software reference guides, all basically useless, which date back to the DOS era and the era of plug-in font cartridges. These have no value today.
WHERE TO GET PARTS
The main source of parts, and some good blow-up diagrams you could print and use for reference, was the Printer Works, in Hayward, California. Hpwever, they seem to have dropped all support for these printers some years ago. But you might check here:
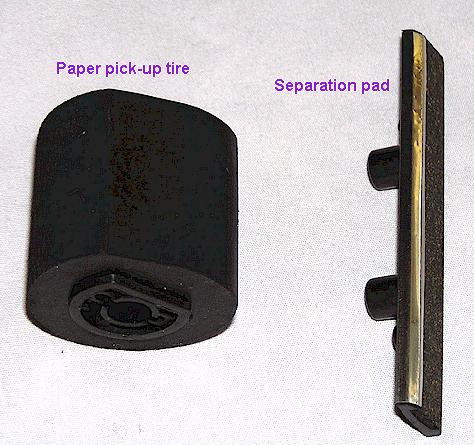
Some parts and essentials like the paper pickup roller (tire) and separation pads were able to be purchased from Partsmart in Georgia, although it looks like they too are phasing them out. Check here:
Note that there are several sellers on eBay who offer "paper jam" kits which consist of a paper pickup roller and a separation pad (see descriptions of these parts below.) Their prices are often cheaper than the regular dealers listed above, so check them out if these are the only parts you need.
www.laserprinterkits.com offers a nice set of parts to replace the separate pad, pick-up roller and a third roller on eBay and on their own website. This kit, as of 2/2020, comes with a great video showing you how to install these parts, which is worth the price alone.
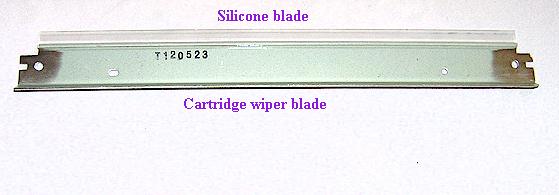
I am trying to source dealers who still offer the cartridge wiper blades and cartridge repair parts. If you know of one, let me know! Hint: If you use Google trying to find a supplier of the cartridge parts such as the wiper blade, you will go nuts with nothing but responses containing sites trying to sell you the whole cartridge, rebuilt. Instead, try searching with the phrase Canon SX "wiper blade" or Canon SX "scraper blade." As long as you see places selling rebuilt cartridges, remember that they are getting the parts somewhere, and you should be able to as well.
So far it looks like these outfits sell at least the wiper blades (it's very difficult to keep links like these working):
TYPICAL TOOLS NEEDED
You will need a long bladed Phillips screwdriver, and magnetize the tip if possible. It also helps to use some kind of tray such as an empty muffin pan to hold the assorted screws. The Laserjet is a Japanese made item, and the Japanese have a strange fondness for using innumerable screws of the same thread but different length and heads, such that if you don't keep track of them, you will have a hard time figuring out where they go back. If you take the cartridges apart, you will be happy you bought or made a "PinPal" tool as shown below in the cartridge repair section. A digital multi-meter can come in handy; Harbor Freight carries some very inexpensive models which will work just fine. A shop-vac with a good air filter is necessary to vacuum up the toner which invariably will spill in assorted places. A pack of Q-tips and a bottle of alcohol is also helpful. A can of no-residue spray contact cleaner such as QD brand, available at auto supply stores and larger hardware outlets, can also be useful. As is a can of compressed air available at the office supply stores.
MEMORY CARDS
The standard Laserjet was supplied without memory cards and they will function that way. There are sockets for two memory expansion cards on the side of the printer base, hidden behind metal covers secured with screws. I like to use 4 MB of memory in these slots, usually two cards with 2 Mb each. Memory is usually found on eBay. The printer will work without memory, but I think you might have issues regarding buffer overflow when printing a large number of pages. Please note that this memory should NOT be expensive. It won't work in anything newer, and as far as the public is concerned, these printers are worthless 1980's boat anchors. Lately, various commercial eBay vendors seem to believe that Laserjet III memory should be quite expensive, and try to sell used pull-out memory cards at ridiculous 1980's prices. 4 Megs' worth of memory card should be $ 10 or less. If you check your local Freecycle Yahoo Group or Craigslist's "Free" section, you may very well find Laserjet III's free for the asking, with memory cards. Note that apparently you can only use one memory card in the III series despite there being two slots. (Why?) And, I am not sure you need memory cards at all when printing via Windows. If you know, please fill me in!
TYPICAL PRINTER PROBLEMS
To understand the typical problems, you need to understand what the various modular assemblies are which make up the printer "engine." These include the fuser station (fuser assembly,) high voltage power supply, main board, DC controller board, power supply, and so forth.
This section is my attempt to help you "cut to the chase" and save time plowing through service manuals and guess work. It consists of common problems and simplified explanations of how to fix them. Most electronic problems involve just changing modules. Therefore it helps to have a spare printer as a parts donor. In fact, it's probably essential to have one. HP did not (apparently) publish or make available actual schematics of each module, and it frankly isn't worth the time and effort to do component level troubleshooting. If you are interested in doing this sort of work, you probably won't be adverse to having some spare printers stowed away for parts. Note that some printers such as Brother and Canon, using the same engines, will be good for parts although the front panel displays and keyboards are not interchangeable, and the mother boards may have different firmware and ROM masks.
There are three problems which seem the most common, and which typically sideline Laserjet printers, outside of problems with the cartridges themselves. All three are mechanical in nature. These are 1) failure to pull paper from the tray, 2) feeding multiple sheets of paper or jamming while doing so, and 3) bubbled fuser roller Teflon coating. Problem 1 will make the printer unusable. Problem 2 will allow some sheets to be printed, but invariably, jams will occur. Problem 3 will allow sheets to be printed, but they will come out looking like @#$% ! See below for details...
Failure to pull paper from tray: This is probably the most common failure in the Laserjets and the number one reason why users will discard or give them away. It's also fairly simple to solve. The symptom is that the printer will begin to try to cycle but stop, and inspection shows that it never pulled paper from the tray. Sometimes you will see a small black mark on the top sheet of paper in the tray. The problem is that the paper "pickup roller," which I call the "pickup tire," has gotten slick and slips against the paper, failing to pick it up from the tray. The rollers get smooth and slick, with age and use. Clay from the paper coats them and makes them slip. Replacement rollers as of this writing are fairly easy to source (see sources on this page) and cost about $ 6 to $ 8. Replacement is somewhat involved but not difficult. You must remove the main cover, the modules to the left and right sides of the shaft where the roller is located, and remove the screws holding the plastic pillow-blocks which hold the shaft to the frame. There are then some c-clips which have to be removed from the shaft and some plastic roller wheels removed, after which the rubber pickup roller can be slid off and replaced with the new one. While you are in there, I strongly recommend you change the separation pad as well. See below under Feeding more than one sheet of paper. Make a diagram of what goes onto the shaft as it is disassembled, or take pictures, so you can put back all the various clips and plastic drum pieces in the proper order. In an emergency, you may be able to rough up the "pickup tire" with some fine grit sandpaper, but it's quite a bit of effort to get at it and just as well to change it altogether. I am told that "Bleche-White," a product sold at auto supply stores for cleaning whitewall car tires, will also revitalize and clean up the rubber pick-up tire if you are really on a budget. Denatured alcohol may clean up the roller enough to get you printing again while you wait for parts.
WARNING: There is a steel collar and clutch assembly at one end of the paper feed shaft. Never loosen the Allen screw or remove that bushing, because that is what determines the timing and they were set at the factory. There is no field procedure for setting the timing if you take this apart, you will have to buy an entire new shaft assembly with roller!
Feeding more than one sheet of paper: Also known as double-feeding, often resulting in a paper jam. This happens when the small cork strip called the "separation pad" gets too smooth and glossy from wear. The separation pad is located in the center of the paper intake area, under where the pickup roller is located. This pad normally gets replaced whenever you do the pickup roller. They are a few Dollars each. Replacement method is obvious when you get the pickup roller out of the way.
Typical high use part numbers
Pickup tire: RA1-3851-XXX Separation Pad: RF1-1145-XXX
Fuser Teflon® Roller: RA1-3968-XXX
Note that the XXX in the above numbers means that the suffix seems to be added by the particular distributor rather than HP. For example, "CLN" as the last three digits means "clone," in other words, an exact replacement part made by a manufacturer other than HP's suppliers themselves. The original HP parts would have a suffix of "OEM." I have never found the clone parts to be any different than the OEM, and OEM parts are becoming increasingly difficult to find.
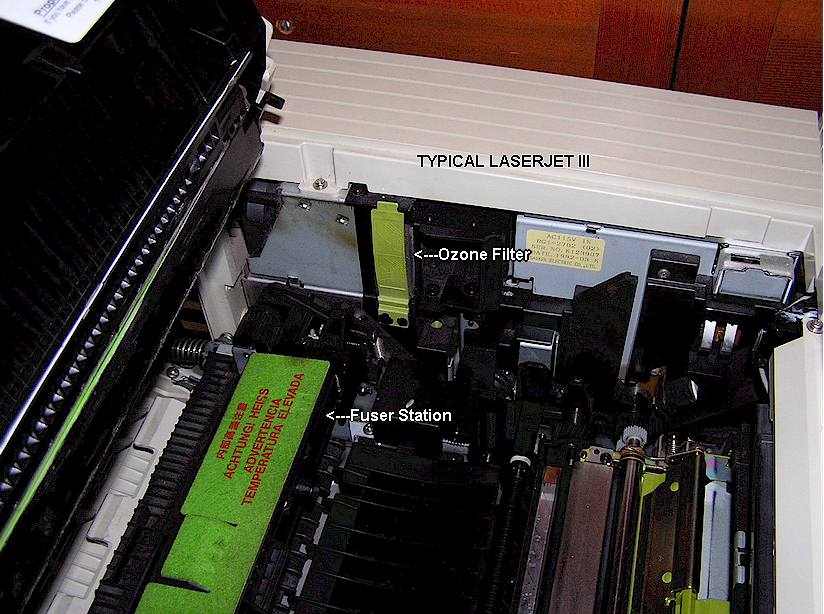
FUSER STATION - -Bubbled upper Teflon® coated user roller: The fuser station is at the rear of the engine and the last stage for the paper before exit. There is a felt cushion strip with a small handle which will pull up and out when you lift the lid of the fuser station (see photo.) This pad normally gets replaced every time the toner cartridge is changed. Look at the roller under the pad when you take the felt strip out. If you see any sort of rippling or bubbling of the Teflon coating of the metal roller in the fuser station, it has to be changed. This will happen every few years during regular use. Fortunately the Teflon coated roller is inexpensive and can be replaced with some effort. In order to replace it, remove the four screws attaching the fuser module, and remove the entire fuser module from the machine, pulling straight up. Once the fuser station is out, in order to remove the roller, you need to remove a number of parts from either end and carefully remove the long glass heater lamp which is located inside the Teflon coated roller. It's suggested that you use a digital camera to take photos of the assembly before disassembly and during disassembly to make sure you get everything back correctly. You have to do quite a bit of disassembly to get the fuser roller out. Wipe the glass lamp clean with alcohol and don't touch it with your fingers or leave fingerprints on it. Best is to use surgical rubber gloves.
There is another roller in the fuser station, a silicone rubber one, however I rarely find issues with these. If necessary, it can be replaced as well.
The fuser station is then replaced by plugging it back straight-down and replacing the screws. The fuser station can be replaced as a unit if you feel it's beyond your ability to replace the Teflon roller, but it isn't really that hard. The roller ran about $ 8-10 from Printer Works.
Tip - screws in deep areas can be replaced easily by using some cellophane tape and taping the heads to the end of the long screwdriver blade. The tape usually then pulls off with the screwdriver blade. You will need a set of long-blade Phillips screwdrivers. It also works to magnetize the tip of the long screwdriver.
Note: Most repairs require that you pull the upper housing off. This is relatively straightforward, remove the screws holding the cover, pull the cover forward and carefully undo the latches for the display and keyboard section. Flip the printer upside down and remove the metal shield bottom plate to access circuit boards.
Noisy fan: There are two fans, the lower and the main exhaust (upper.) The lower fan runs all the time, and usually will be the noisy one. It looks like a long, skinny squirrel cage. They get noisy with age as the bearings fail. Re-lubrication never seems to help. The solution is replacement with a good used one or a new old stock fan. To access the fan, you need to stand the printer upside down and remove the bottom cover panels, as above. Parts Mart did stock the lower fans at a bargain $ 7.00 each, otherwise Printer Works might still have them.
"Ready" lamp never lights but fuser is hot: If the printer never reaches the "ready" mode after a suitable warm-up time, but the fuser station is obviously hot, the usual problem is a failed DC Controller board. I don't know why but I have had a lot of these. The manual will tell you that the fuser station has to reach a certain temperature level before the DC controller will come out of "warming up," and that a bad thermistor sensor can cause this, however the usual problem is a defective DC controller. You will almost always see a "50 Service" message in the display window when this happens.
A typical full-reliability overhaul usually involves replacing the paper pickup roller, separation pad and the Teflon fuser roller (if bubbled.)
For other problems, refer to the flow chart in the service manual, but bear in mind that the troubleshooting section was written by engineers who were guessing at possible problems which could occur, rather than by field service personnel sharing their years of experience.
Click here for NOTES SENT IN BY READERS REGARDING SX PRINTER ENGINE REPAIRS
ROUTINE MAINTENANCE
Routine maintenance usually is done whenever the cartridge is changed. This would include vacuuming the inside, at the paper path, and replacing the fuser roller wiper strip (which comes with the new cartridge.) One other thing to consider is the ozone filter. The ozone filter is a perforated charcoal block which filters the exhaust air to limit ozone emissions into your work area. Depending upon which model printer you have and the age, the filter may pull out easily or require somewhat more disassembly. The filter is located inside the air intake on the right rear edge of the printer when viewed from the front. Under the circumstance that you probably have no idea when the filter was changed before, if ever, it's a good idea to start out with a new one. It's unlikely that you will then have to replace it sooner than several years from now, unless you are using the printer extensively. There are two styles of filter, early and late. II's and some III's have the early style. Make sure you order the right filter. Printer Works has part numbers and diagrams of the different filter styles.
CARTRIDGE REFILLING
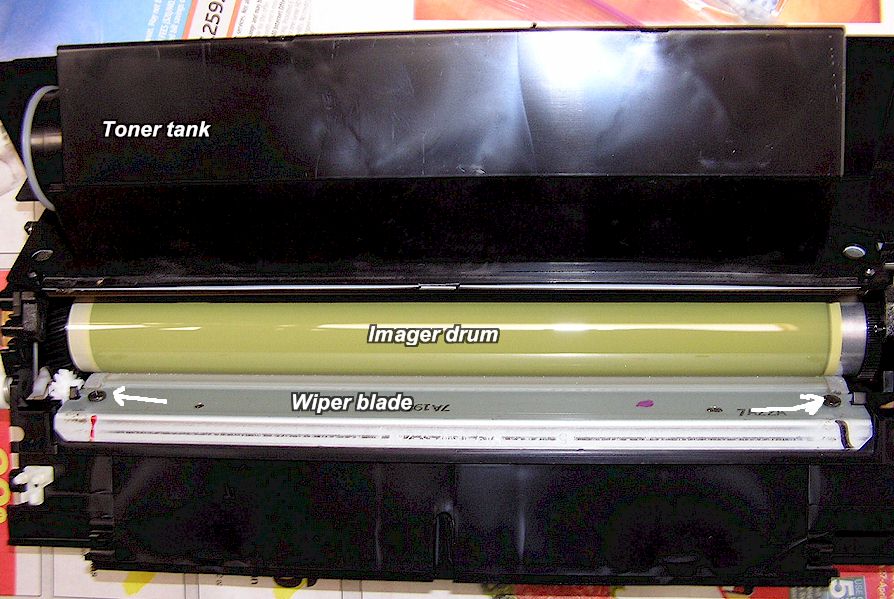
Yes, you can refill these toner cartridges for a lot less than than buying new ones, just like people do with inkjets, although the price of unused 95A cartridges keeps falling and at some point this may no longer be true. Please avoid the rather useless refill kits which come with a modified soldering iron and which advise burning a bunch of holes into the cartridge tanks to allow refill of new toner and removal of waste toner, without removing the cartridge cover. This just makes a mess, and most of the time the cartridge won't work properly afterwards. In order to properly refill the cartridge, you need to remove the outer shell section, and these days, 9 times out of 10 you will need to replace the drum wiper blade, because they fail with age. This outer shell is held on by four friction-fit plug pins and a plastic bracket around the area where the pull-out strip exits. [Photos to follow]
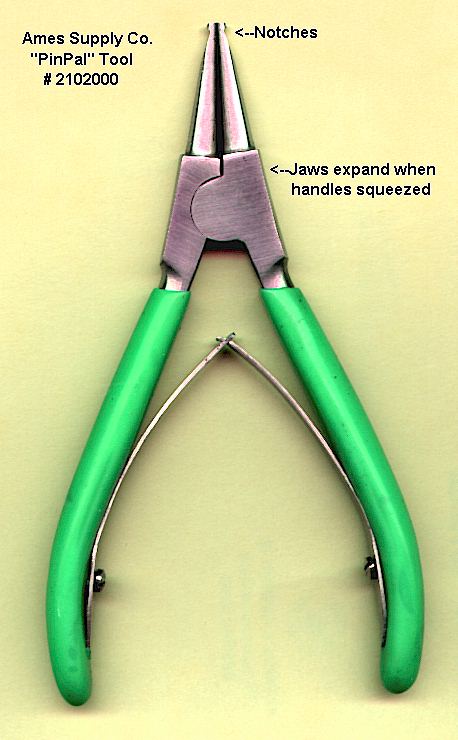
It is necessary to remove these plugs and the bracket. The plugs are most easily removed with a special tool called a "pin-pal," see photo. This makes a miserable job easy, and preserves the pins in as-new condition. You may be able to make such a tool out of a pair of expanding cir-clip removal pliers from an auto supply store. This tool is a must-have to keep you from going crazy! The pin-pal shown in the photo was sold by Ames Supply Company, a manufacturer of repair supplies for copiers, printers and typewriters. I believe the tool might be available elsewhere, but you will have to rummage around to find a supplier.

Before starting work on the cartridge, it is recommended that you wear rubber gloves and a face mask respirator. I can not stand those throw-away dust masks which are just a molded piece of filter paper- - exhaling heats the whole thing up and makes them very uncomfortable. There are PVC professional-style respirators with replaceable cartridges available on eBay for $ 12-13 including postage. Check them out.
You will need replacement toner. There are several vendors who sell this toner, check the web. Try to pick a vendor which also sells the fuzzy wiper strips for the fuser station, which usually come with a new cartridge, as well as the replacement wiper blades for the imager drum inside the cartridge, because you will need both sooner or later.
After removing the upper shell, analyze the cartridge and you will see a white plastic push-in plug cap where the toner tank is located. Stand the cartridge on the end and brace it so that it is stable, pull out the plug and refill the tank with toner. It helps to use a funnel and this is a rather messy, dusty job. Wear the respirator and have newspapers spread underneath the cartridge. Toner on your hands washes away most easily in cold, soapy water. If you don't have a funnel that fits, a clean piece of paper can be rolled up and taped into a funnel shape. [Photos to follow]
Vacuum any spilled toner out of the cartridge and reassemble. Note that most vacuum bags won't stop all the toner dust and you are probably best either doing the vacuuming outside with a face mask or putting the vacuum outside and snaking the hose in through a mostly closed door. The best way is with the brush attachment on the vacuum hose. At least for the first refill, I have not found it necessary to empty the spent toner tank, which is a considerable nuisance. In fact, I have fully refilled cartridges twice without emptying the spent toner tank. The cartridge can then be reassembled and replaced in the printer. However, you are probably going to find it necessary at a minimum to clean and re-lubricate the wiper blade (see below under "streaking.") In many cases, particularly these days when most cartridges, even unused ones, are several years old, you will probably have to replace the wiper blade in the cartridge as well. [Photos to follow]
Check the section above, "Where to get parts." You may need to enter the cartridge type in a search box; the OEM cartridge number is HP 92295A. Don't enter Laserjet Cartridge in any search engine or you will never find what you want amidst the thousands of Spam listings for rebuilt cartridges. If you don't want to bother refilling your cartridges, it's still pretty easy to find inexpensive rebuilt cartridges. You should be able to source a rebuilt cartridge with a warranty for at or less than $ 25. The downside of the rebuilt cartridge is that you don't know how many times it's been rebuilt or whether the imager drum is still as good as new. Some rebuilders are better than others and replace the drum and almost all internal parts. It often happens that the used imager drums in cheaper rebuilt cartridges have tiny chips in the selenium surface, which will make a corresponding repeating black speck on the printed page. You are less likely to experience this if you rebuild your own cartridges, because you will be more careful handling your drum than a recycling factory worker.
CARTRIDGE PROBLEMS
Here is where things get interesting. If there are any problems which the service manual decides are caused by a defective toner cartridge, it will just tell you to replace the cartridge. HP never expected the end user to go anywhere near the inside of the cartridge, thus there is no advice on how to refill the cartridge in the factory manuals, much less on repairing them. The same goes for the rather useless "laser printer repair" books I have bought, which are little more than re-hashes of the "theory of operation" pages from the factory manuals, and suggests to me that the authors never actually repaired a printer in their life! The HP 95A cartridge was never cheap to start with, and buying a sealed new OEM HP branded cartridge from a retailer these days is becoming difficult and very expensive. Buying one on eBay is a crapshoot because you generally don't know how old it is. HP quit date-labeling Laserjet cartridges many years ago. This makes it harder to know whether a "brand new" cartridge is still going to work. Buying a recycled cartridge which has been cleaned and refilled is fairly safe, particularly if they have a warranty, although often these cartridges have scratched or pitted imager drums from careless handling and rebuilding, which produce less than perfect pages. As mentioned above, you have no idea how many times the imager drum has been re-used, or what parts have been replaced inside. Please note that toner does not "dry up" like ink in an inkjet cartridge. You should be able to use the toner no matter how old it is, so long as it hasn't gotten wet and clumped up.
Remember that in the event you have a cartridge which has become defective, you really have nothing to lose by trying to repair it!
The root of all cartridge evils is primarily that they were manufactured in China. That should say everything.
Here is a link to a repair procedure for the SX cartridges, from Summit Technologies, as a pdf document. Unfortunately it doesn't provide any photos or diagrams:
Canon SX Cartridge Refill Process-pdf page
HERE IS MY METHOD OF CARTRIDGE REPAIR:
1) Place the cartridge with the Laserjet label facing up and away from you. Pull out the holding pins on the ends. There are two on each end. You might want to mark the holes where they will go back with a Sharpie as there are some confusing empty holes that don't take them or anything else.
2) If this is a new cartridge (yes, you now even have to rebuild brand new cartridges because of how long they have been sitting,) carefully remove the triangular piece that is popped in around the tab which is normally pulled out when the cartridge is installed, that tab being on the end of the long clear tape strip that keeps the toner from leaking.
3) Now carefully remove the top section. It will pull straight up and off with wiggling. Set it aside.
4) Notice the white plastic three pronged peg on the left end that holds the corona wire assembly in place. Pry this out carefully and then wiggle the corona wire assembly free. Note how the corona assembly must fit into little peg on the right end and in turn be held by the white peg assembly on the left. Careful to not scratch the imager drum with the corona assembly.
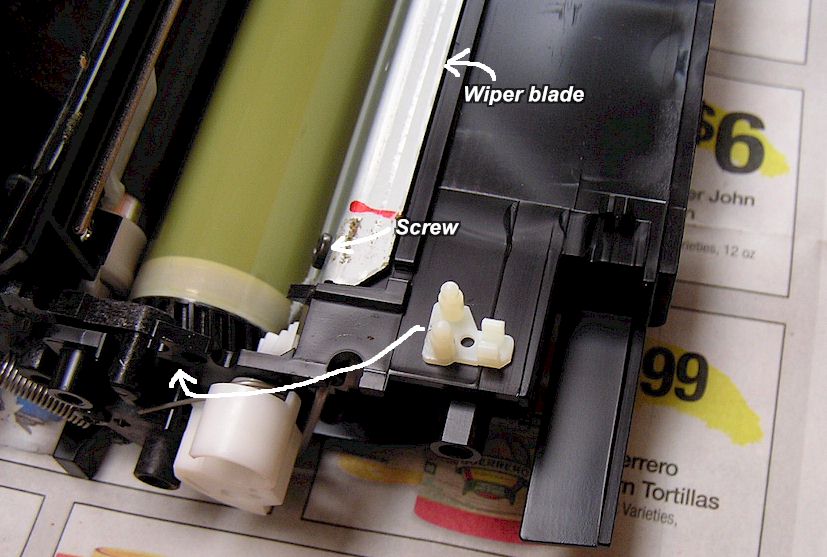
5) Note the wiper blade now visible, held by two black Phillips head screws. Using a long screwdriver, carefully remove the screws. The wiper blade can now be gently pried up and out. Clean out any loose cushioning foam pieces with tweezers. Stay clear of imager drum. Note that the view below shows the corona wire assembly removed. It normally sits on top of the wiper blade.
6) Dust the new blade with pixie dust on both sides and using a sock with some pixie dust in it, dust the imager drum along its length. Replace the wiper blade with the new one and carefully reinstall the screws and tighten them. Replace the corona assembly next, making sure it isn't dragging on the imager drum. Note: Mark the old blade or throw it away immediately to prevent accidentally putting it back in by mistake. As I did once, and then wondered why things were worse instead of fixed. Now put the top cover back on and reinstall the pegs. Reinstall the triangular piece around the sealer strip handle tab if this was a new cartridge. See photos below.
If you are rebuilding a used cartridge, please note that the only difference will be that it will be a lot more messy, the sealer strip will not be there, and you will need to have toner, which you refill via the plastic cap on the left end, with a funnel. I have found that you don't need to empty the spent toner tank when rebuilding a cartridge that is used, at least the first time. I have also found that it is unlikely that you will be able to get more than one recharge anyway, as the imager drum will often be too degraded by then and will have chips or scratches that ruin the quality of the print.
REPAIRS ABOVE AND BEYOND SIMPLE REFILLS
Misleading problems: First, make sure that the issue is definitely in the cartridge and not the fuser station. Bubbled and damaged heated fuser rollers can create print issues similar to a bad cartridge. If the fuser roller is bubbled, peeling or scratched, replace that first (see fuser station repairs, elsewhere in this page.)
Vertical Line: You may find a thin black vertical line on the printed page. This may be caused by a scratched drum, in which case the only solution is to replace the drum. It may also be caused by a problem with the wiper blade, which is far more likely (see "streaking" below.) Another less common problem to consider is that there may be foreign matter or dirt on the mirror. The mirror is located under a sliding shutter on the hinged upper cover assembly, and can be exposed after the cartridge is removed, by swinging up the shutter door. Clean the mirror with Windex and a lint-free cloth. Be careful and gentle.
Repeating spots: You may have a black dot or spots which appear on the page at exactly the same place. This can be caused by chips in the drum surface, unfortunately the solution is to replace the drum or the whole cartridge. They may also be caused by toner clumps stuck to the drum. There are drum polishing pads and similar products designed to clean these off. You can try a soft tissue with a small amount of toothpaste on it and water, but don't use abrasive toothpastes such as tartar control types.
Streaking (Wiper Blade): Here's a typical and common problem which has been happening with increased frequency...a brand new, OEM HP branded toner cartridge is put into the machine. The cartridge has been in storage for possibly 10-12 years. It makes maybe 5-10 flawless pages, if that, then starts leaving wide, dark and vertical shadowy streaks across the paper from top to bottom, around 1-2 inches wide, often along with a horizontal ragged black line of toner at one or two spots about 1/3 from the top or bottom of the page. Sometimes the streaks only start at the middle of the page (drum out of round or axles bent?) I have recently gone through three new cartridges before I finally found one which worked OK! As time goes by, it's just going to get worse with new old stock cartridges.
This problem is caused by excess toner remaining on the drum, because the wiper blade is not properly cleaning the drum (the drum turns multiple times per page.) The question of exactly why this is happening is not really clear. If you have an explanation, please share it! My impression is that what has happened is that the lubricant used on the silicone wiper blade has evaporated or gotten sticky to the extent where it is causing the wiper blade to drag on the drum surface rather than presenting a sharp edge to it, and also that the wiper blade is failing to maintain a straight edge (warpage) because of being in tension against the drum for years before use. In addition, the cartridge parts sellers say that the wiper blade hardens with age and that any showing a yellowish discoloration should be changed. I don't buy this as silicone doesn't harden with age.
To correct the blade problem, change it as shown above.
Clean the corona wire with a Q-tip soaked in alcohol before replacing it if this is a used cartridge.
Some parts suppliers offer the cellophane strip in addition to the wiper blade, however these usually look OK and I have been able to avoid replacing them so far. The parts sources I have used have not offered the cellophane strip.
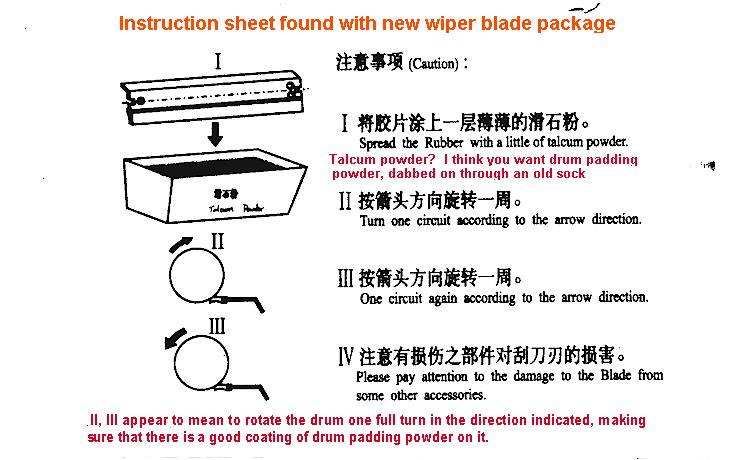
After reassembling the side with the scraper blade, manually move the drum one turn as shown in the ghastly Chinese instructions below, and then one turn the other way, liberally padding the drum with the padding powder while you turn it. This is apparently just to spread a layer of pixie dust. You will probably find that the new blade exerts more tension against the drum than the original, a good thing, but making the drum a bit harder to turn. If the cartridge has been used for awhile, consider topping off the toner (in the other half of the cartridge) while you have it apart. Reassemble the whole cartridge and vacuum excess pixie dust off the protective shutter over the drum. Be careful not to get excess pixie dust or toner on the corona wire assembly, otherwise there will be print problems. Run several test pages through the printer to confirm that they have been printed correctly.
It has been my experience that the streaking problem usually returns near the end of the toner supply in a rebuilt cartridge. It does this in cartridges rebuilt by others as well, but cleaning the scraper blade assembly once again eliminates the streaks. I am not sure why this is happening, but I believe it is because the toner, with age, is clumping or forming small, hard bits which get caught under the scraper blade. If anyone has a better idea, do let me know! The parts houses also sell a "recovery blade" which I have not investigated and I don't know what it does. This should be in the toner delivery section of the cartridge and it may need to be replaced as well, I just haven't investigated this yet.
I have not found it necessary to evacuate the spent toner tank for at least two refills. If you want to do this, there are soldering iron kits which melt holes at strategic places allowing you to suck the used toner out of the tank at three (?) places corresponding to the chambers of the tank.
I have not had 100% success doing these rebuilds, on the first go-around. Sometimes you have to take them apart again and clean the corona wire more and vacuum toner spilling out of the developer side.
_______________________________________________________________________________________________________________________________
NOTE REGARDING WIPER BLADES AS OF JUNE 2022:
It is becoming difficult to find any source of these wiper blades as we arrive in summer 2022. I have learned that the Canon FA9-2733-000 "Drum Cleaning Blade" will work in these cartridges, although it may be necessary to snap off a small piece of plastic first. Compare the old blade removed from the cartridge with the new one to determine any differences. These Canon blades are at the present time available from Precision Roller, their website is http://www.precisionroller.com and the blades as of this writing were $ 12.95. Yes, that's several times what they once were but we are dealing with a very obsolete part and it is better than not having any source at all!
DON'T DO THIS! When using the printer, try to avoid making double-sided pages. The trip the first time through the fuser station affects the paper and when you put the second side through again using the manual paper feed slot or upside down in the tray, this invisible fuser residue will make the paper jam and also coat the rollers, making them slip and again, a paper jam. I do this once in awhile for a good reason, but invariably the second side will either cause a jam or have toner spots on it. It is never a good idea to try to make double-sided pages on any older laser printer or photocopier machine that has to make two passes on the drum and fuser station to do it.
TRIVIA: There are a couple different types of toner, although today you are only likely to find the normal type. Originally, there was also a "MICR" toner which uses highly magnetic particles and was used for printing bank checks, and it is substantially more expensive than the standard toner. I can't think of why you would need it. Technically, all toner is magnetic, I think MICR is just more so.
These printers use a LOT of power, as in 800 intermittent Watts! You will want to shut the printer off whenever you are not printing something, to keep your power bill from being sky-high and to keep your printer from cooking itself to death. Note also that all but the most robust interior electrical wiring of a home or office will have the lighting flickering in step with the fuser heater going on and off in the printer!
Ver. 6/30/2022